
How to Set Up Payments at Events
INEMAGS® allows you to accept payments for magnets and other photo products directly at your events. Guests can select products, upload their photos, and pay by card without leaving the event page.
Once payment is completed, the uploaded photos become orders that you can view, manage, and print.
This guide covers setting up paid products, testing checkout, and managing paid orders.
Before You Start
To accept payments at your events, you need to connect Stripe Connect and complete your payment account setup.
Important: If Stripe Connect is not connected or isn't ready to accept payments, paid products will not be visible to guests.
Step 1. Open Your Event
- Go to Markets & Events → Events.
- Select the event where you want to accept payments.
- Open the event page.
If you haven't created an event yet, create one first.

Step 2. Connect Stripe
NINEMAGS® uses Stripe Connect to process event payments.
- Open Integrations.
- Find Stripe.
- If you haven't connected an account yet, start the connection process.
- Follow the instructions provided by Stripe to complete your setup.
- Make sure your payment account is ready to accept payments.
Stripe may ask you to provide business information, verify your identity, and add bank details for payouts.


Important: If your Stripe setup is incomplete, paid products will not appear on the guest event page.
Step 3. Set Up Products and Prices
- Open your event.
- Go to Products.
- Add the products you want to sell or select existing ones.
- Set a price for each paid product.
- Check which products are available to guests.
You can also review additional options under Settings → Products & Pricing.
You can offer multiple products with different sizes, types, and prices within the same event.


Step 4. Configure Photo Packs (Optional)
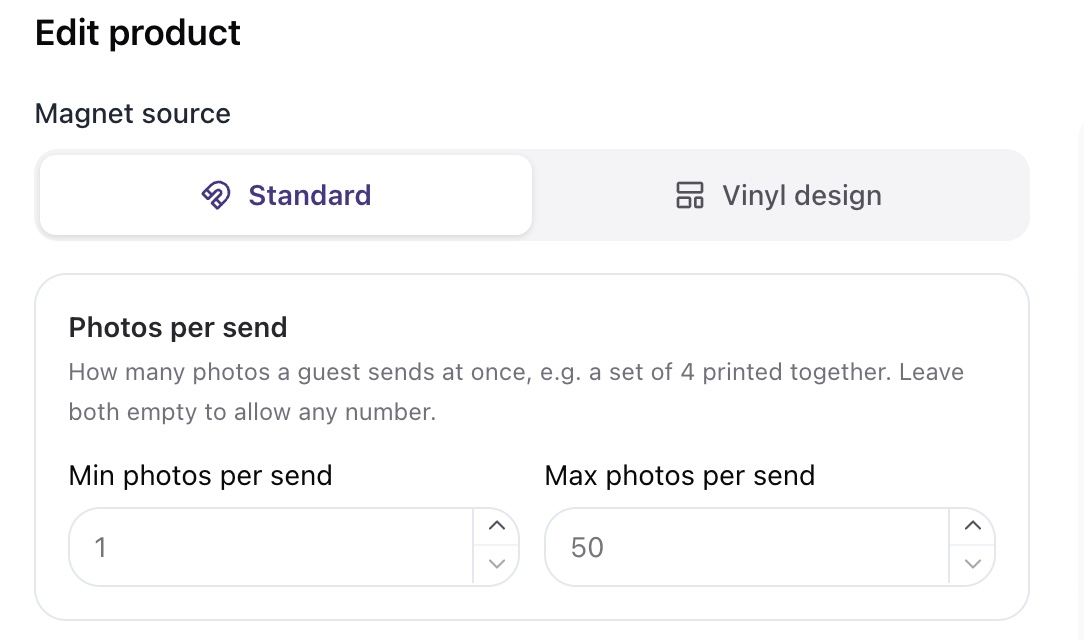
Photo Packs allow guests to submit multiple photos together as a group.
For each product, you can set:
- Minimum photos — the minimum number of photos per submission.
- Maximum photos — the maximum number of photos per submission.
For example, if you configure a pack of four photos, guests will see a label such as Pack of 4 photos.
When using Photo Packs:
- Pricing is calculated per photo, not per pack.
- All photos in a pack are submitted together.
- If a guest removes one photo from a pack, the entire pack is removed.
-
Step 5. Check Your Print Settings
Paid orders can be sent to printing automatically.
By default, the option to print each paid order on a separate print sheet is enabled.
To review this setting:
- Open your event.
- Go to Settings → Printing.
- Find the automatic printing option for paid orders.
- Make sure the selected option works for your printing workflow.

Important: Printing each order on a separate sheet may increase paper usage. We recommend reviewing this setting before your event.
Paid photos can also be reprinted when needed.
Step 6. Test Checkout Using the Test Link
We recommend testing the entire checkout process before your event starts.
Each event has a dedicated Test Link that lets you place test orders using test cards without making real payments.
- Open your event and find the Test Link.
- Open the test link.
- Make sure the orange test-mode banner appears on the page.
- Select a product and upload photos.
- Add your selection to the cart.
- Complete checkout using a test card.
- Return to NINEMAGS® and check the test order.


About Test Orders
- Test orders are clearly labeled.
- They are not included in actual sales statistics.
- You can filter them in your order list.
- Test orders can be deleted when no longer needed.
Important: The Test Link is for testing only. To accept real orders, share your regular event link or QR code with guests.
Step 7. Make Your Event Available to Guests
After checking your settings, make sure guests can access your event.
If guest access depends on the event status, set it to In Progress.
Then share your regular event link or QR code.
What Guests See
- Guests open the event page using the link or QR code.
- Select a product.
- Upload their photos.
- Add their selection to the cart.
- Pay by card.
- Receive an order confirmation email.
Once payment is completed, the uploaded photos become an order in NINEMAGS®.

Step 8. View and Manage Paid Orders
Paid event orders are available in the main orders section.
- Go to All Orders.
- Select the Markets & Events tab.
- Find and open the order you want to review.
Here, you can view orders placed during your events.
Print files are processed according to your event settings. Paid photos can also be sent for reprinting when needed.

Good to Know
- Stripe Connect must be connected and ready to accept payments.
- Paid products are hidden from guests if Stripe Connect is not ready.
- Photo Packs let you set the minimum and maximum number of photos per submission.
- Photo Pack pricing is calculated per photo.
- By default, each paid order is sent to printing on a separate sheet.
- The Test Link allows you to check the checkout process without making real payments.
- Test orders are not included in actual sales statistics.
- Paid photos can be reprinted when needed.
Done!
Your event is ready to accept payments.
Guests can select products, upload photos, and pay directly on the event page.
You can find and manage paid orders under All Orders → Markets & Events.